0x00 前言
前一阵因为工作的原因需要反复在一个网站上看点儿东西,但是有个东西老得手动算一下,这里觉得比较费劲,就顺手学了一把chrome插件,感觉挺好使的,同事用了,都说好(手动滑稽),后来觉得这个东西还挺好玩的,就顺手想写个东西放git上玩一玩,于是就有了这个文章。总的来说,写了一个用于github一键三连的按钮(watch/fork/star)按钮 https://github.com/EggUncle/GithubComboButton ,代码量非常少,但是我觉着也涉及到了chrome插件开发相关的方方面面吧,所以这里记一下整个开发过程和涉及到的知识,主要还是太菜了嗨呀,前段和js不太会,踩了很多坑。
0x01 chrome扩展介绍
嗨呀还是直接看这个介绍吧:
0x01 chrome 插件基本文件结构介绍
这里先看一下,我写的那个github三连插件的目录结构,这里的目录层级仅仅是按照笔者自己的习惯来的,只要在manifest.json中配置好路径一类的,目录层级是什么样的都行1
2
3
4
5
6
7
8
9
10
11
12
13➜ GithubComboButton git:(master) ✗ tree .
.
├── LICENSE
├── README.md
├── html
│ └── popup.html //chrome插件用到的html文件
├── icons //chrome扩展的图标
│ └── icon.png
├── manifest.json //chrome扩展的配置文件,名称是固定的
└── scripts //chrome扩展的js代码
├── background.js
├── content_scripts.js
└── popup.js
0x02 chrome 插件配置文件介绍
1 | { |
配置文件相关的配置还有很多,这里仅仅列出与这次写的插件的相关配置,接下来按照我之前开发的顺序,介绍一下content_scripts、background、page_action
0x03 content_scripts 介绍
最早写的就是这部分,主要的功能也都是在这里,它可以像页面注入js,修改DOM等,但是缺点是,它不是真正完全融入网页上下文的,而是运行在一个单独的被隔离的环境中,不能调用页面中的js。如果真的出现了必须调用的情况,可以使用inject js的方式,简单来说,就是在content script中,写一个逻辑,讲代码注入进去,这里可能有点绕233333。这里再简单介绍一下,我在github三连插件中是如何使用content script的。
首先看一张图,明确一下到底要做个啥。
总的来说,就是做一个这样的combo按钮,然后在点击之后自动进行watch star 和fork,并且可以自动配置按钮的点击功能,例如仅仅在点击之后进行watch star但是不fork,或者配置watch的方式等。然后我们直接来看代码嗷,代码比较少,所以这里直接列出整个content script了1
2
3
4
5
6
7
8
9
10
11
12
13
14
15
16
17
18
19
20
21
22
23
24
25
26
27
28
29
30
31
32
33
34
35
36
37
38
39
40
41
42
43
44
45
46
47
48
49
50
51
52
53
54
55
56
57
58
59
60
61
62
63
64
65
66
67
68
69
70
71
72
73
74
75
76
77
78
79
80
81
82
83
84
85
86
87
88
89
90
91
92
93
94
95
96function clickStarBtn() { //单独来看,这个函数非常简单,获取了star功能的按钮,执行它的点击事件就好了,后面的watch和fork功能点击功能同理
var btnLiTag = document.getElementById('ch_ext_id_star_btn')
var btnArr = btnLiTag.getElementsByTagName('button')
var starBtn = btnArr[1]
starBtn.click()
}
function clickWatchBtn(pWatchType) {
var btnLiTag = document.getElementById('ch_ext_id_watch_btn')
var btnArr = btnLiTag.getElementsByTagName('button')
var releaseOnlyBtn = btnArr[1]
var subscribedBtn = btnArr[2]
var ignoreBtn = btnArr[3]
if (pWatchType == 'ignore') {
ignoreBtn.click()
} else if (pWatchType == 'release_only') {
releaseOnlyBtn.click()
} else if (pWatchType == 'subscribed') {
subscribedBtn.click()
}
}
function clickForkBtn() {
var btnLiTag = document.getElementById('ch_ext_id_fork_btn')
var btnArr = btnLiTag.getElementsByTagName('button')
var forkBtn = btnArr[0]
forkBtn.click()
}
function initComboBtn() { //这里对combo按钮进行初始化
var btnLayoutArr = document.getElementsByClassName('pagehead-actions') //pagehead-actions 这个类的标签包括了watch star fork三个按钮,后需要通过获取它的子node来找到watch star fork三个按钮
var btnLayout = btnLayoutArr[0]
if (btnLayout == undefined) {
return 0
}
var btnArr = btnLayout.getElementsByTagName("li");
var btn = document.createElement("li");
btn.setAttribute("id", "combos_3");
var len = btnArr.length;
//因为在原始页面中,watch star fork这几个按钮对应的标签都是没有id或者其他可以方便拿到这个node的东西的,所以这里在找到他们之后,给他们设置id,方便后续的使用
var watchBtn = btnArr[len - 3];
watchBtn.setAttribute("id", "ch_ext_id_watch_btn");
var starBtn = btnArr[len - 2];
starBtn.setAttribute("id", "ch_ext_id_star_btn");
var forkBtn = btnArr[len - 1];
forkBtn.setAttribute("id", "ch_ext_id_fork_btn");
//这里考虑到有时候页面上不光会有那三个按钮,还有会有used by等等,但是我期望吧combo按钮放在最左边,所以这里尝试找到最左边的按钮了
var comboBtnRightId = 'left_btn'
if (len == 3) {
comboBtnRightId = "ch_ext_id_watch_btn"
} else {
var leftBtn = btnArr[0]
leftBtn.setAttribute("id", "left_btn");
}
//combo按钮的html代码
//newBtnHtml = '<div class="js-toggler-container js-social-container"><button type="submit"class="btn btn-sm btn-with-count js-toggler-target"aria-label="Unstar this repository"title="Star microsoft/vscode"id="combo_btn"><svg class="octicon octicon-star v-align-text-bottom"viewBox="0 0 14 16"version="1.1"width="14"height="16"aria-hidden="true"><path fill-rule="evenodd"d="M7.85,13.36c3,-3.12 4.99,-5.17 4.99,-7.69c0,-2.05 -1.41,-3.67 -3.21,-3.67c-1.01,0 -1.99,0.54 -2.62,1.39c-0.64,-0.85 -1.61,-1.39 -2.62,-1.39c-1.8,0 -3.21,1.61 -3.21,3.67c0,2.52 1.98,4.57 4.99,7.69l0.85,0.88z"></svg> Combo</button></div>'
newBtnHtml = '<div class="js-toggler-container js-social-container"><button type="submit"class="btn btn-sm btn-with-count js-toggler-target"aria-label="Unstar this repository"title="Star microsoft/vscode"id="combo_btn"><svg class="octicon octicon-star v-align-text-bottom" viewBox="0 0 1024 1024" version="1.1" p-id="1176" width="16" height="16" aria-hidden="true"><path d="M510.671749 348.792894S340.102978 48.827055 134.243447 254.685563C-97.636714 486.565724 510.671749 913.435858 510.671749 913.435858s616.107079-419.070494 376.428301-658.749272c-194.095603-194.096626-376.428302 94.106308-376.428301 94.106308z" fill="#FF713C" p-id="1177"></path><path d="M510.666632 929.674705c-3.267417 0-6.534833-0.983397-9.326413-2.950192-16.924461-11.872399-414.71121-293.557896-435.220312-529.448394-5.170766-59.482743 13.879102-111.319341 56.643068-154.075121 51.043536-51.043536 104.911398-76.930113 160.095231-76.930114 112.524796 0 196.878996 106.48115 228.475622 153.195078 33.611515-45.214784 122.406864-148.20646 234.04343-148.20646 53.930283 0 105.46603 24.205285 153.210428 71.941496 45.063335 45.063335 64.954361 99.200326 59.133795 160.920016C935.306982 641.685641 536.758893 915.327952 519.80271 926.859589a16.205077 16.205077 0 0 1-9.136078 2.815116zM282.857183 198.75574c-46.25344 0-92.396363 22.682605-137.127124 67.413365-36.149315 36.157501-51.614541 78.120218-47.25321 128.291898 17.575284 202.089671 352.199481 455.119525 412.332023 499.049037 60.434417-42.86732 395.406538-289.147446 414.567947-492.458945 4.933359-52.344159-11.341303-96.465029-49.759288-134.88199-41.431621-41.423435-85.24243-62.424748-130.242319-62.424748-122.041544 0-220.005716 152.203494-220.989114 153.742547-3.045359 4.806469-8.53335 7.883551-14.101159 7.534603a16.257266 16.257266 0 0 1-13.736863-8.184403c-0.902556-1.587148-91.569532-158.081365-213.690893-158.081364z" fill="#885F44" p-id="1178"></path></svg> Combo</button></div>'
//将combo按钮加入到最左边的按钮左边
btn.insertAdjacentHTML('afterbegin', newBtnHtml);
var btnTag = btn.getElementsByTagName("button")[0];
btnTag.style.borderBottomRightRadius = "3px";
btnTag.style.borderTopRightRadius = "3px";
var targetBtn = document.getElementById(comboBtnRightId);
btnLayout.insertBefore(btn, targetBtn);
//这里设置combo按钮的点击事件
var comboBtn = document.getElementById('combo_btn');
comboBtn.onclick = function() {
//里面执行的流程涉及到与background的通信,我们放在最后讲
chrome.runtime.sendMessage('', function(response) {
  var responseObj = JSON.parse(response)
  var watchType = responseObj.watchType
  var starCombo = responseObj.starCombo
  var watchCombo = responseObj.watchCombo
  var forkCombo = responseObj.forkCombo
  if (forkCombo == 1) {
    clickForkBtn()
  }
  if (starCombo == 1) {
    clickStarBtn()
  }
  if (watchCombo == 1) {
    clickWatchBtn(watchType)
  }
});

}
}
initComboBtn()
0x04 background介绍
他比较像是一个一直在后台执行的东西,当然了它的周期也是可以控制的,但是我这里选择了常驻,因为需要用它读取配置文件,以及在不相关的页面将浏览器扩展列表中github三连扩展置灰的功能。
嗨呀这里也直接看代码吧,因为代码比较少。1
2
3
4
5
6
7
8
9
10
11
12
13
14
15
16
17
18
19
20
21
22
23
24
25
26
27
28
29
30
31
32
33
34
35
36
37
38
39
40
41
42
43
44
45
46
47
48
49
50
51
52//这里实现了两个函数用来操作配置文件(读/写)
function setLocalStorage(pWatchType, pStarCombo, pWatchCombo, pForkCombo) {
localStorage['watchType'] = pWatchType
localStorage['starCombo'] = pStarCombo
localStorage['watchCombo'] = pWatchCombo
localStorage['forkCombo'] = pForkCombo
}
function getLocalStorage() {
var result = new Object()
result.watchType = localStorage['watchType']
result.starCombo = localStorage['starCombo']
result.watchCombo = localStorage['watchCombo']
result.forkCombo = localStorage['forkCombo']
return JSON.stringify(result)
}
//这里用来实现那个在github页面时,浏览器上的对应插件按钮彩色,而在其他页面该按变成灰色的功能
chrome.runtime.onInstalled.addListener(function() {
chrome.declarativeContent.onPageChanged.removeRules(undefined, function() {
chrome.declarativeContent.onPageChanged.addRules([{
conditions: [
new chrome.declarativeContent.PageStateMatcher({
pageUrl: {
urlContains: 'github.com'
}
})
],
actions: [new chrome.declarativeContent.ShowPageAction()]
}]);
});
});
//这里涉及到通信,下面再讲
chrome.runtime.onMessage.addListener(function(request, sender, sendResponse) {
  var response = new Object()
  response.watchType = localStorage['watchType']
  response.starCombo = localStorage['starCombo']
  response.watchCombo = localStorage['watchCombo']
  response.forkCombo = localStorage['forkCombo']
  sendResponse(JSON.stringify(response));
});
//这里仅仅是在第一次使用插件时进行默认配置用的
var isFirstLoad = localStorage['comBoinit']
if (isFirstLoad != 1) {
localStorage['comBoinit'] = 1
localStorage['watchType'] = 'subscribed'
localStorage['starCombo'] = 1
localStorage['watchCombo'] = 1
localStorage['forkCombo'] = 1
}
0x05 page_action介绍
有了上面的代码,其实就已经可以实现三连的功能的,但是这样还是太粗暴了,考虑到使用者(嗨呀假设我写的这个东西真的有人用嗷)可能会有配置的需求,比如说设置配置连击功能或者是watch类型的情况,这里还需要有个配置页面。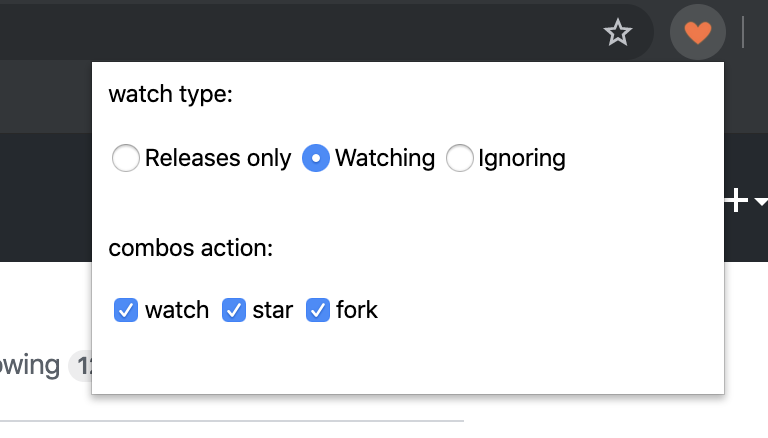
接下来又到了喜闻乐见的看代码环节,总的来说逻辑比较简单,就是根据页面点击来读取和设置配置文件这样,需要注意的是,配置文件的操作我都是在background里面做的,前端代码在这里 https://github.com/EggUncle/GithubComboButton/blob/master/html/popup.html 我不太擅长html这个。。所以页面略丑1
2
3
4
5
6
7
8
9
10
11
12
13
14
15
16
17
18
19
20
21
22
23
24
25
26
27
28
29
30
31
32
33
34
35
36
37
38
39
40
41
42
43
44
45
46
47
48
49
50
51
52
53
54
55
56
57
58var watchTypeForm = document.getElementById("watch_type_id");
var backgroundPage = chrome.extension.getBackgroundPage();
var config = JSON.parse(backgroundPage.getLocalStorage())
var watchType = config.watchType
var starCombo = config.starCombo
var watchCombo = config.watchCombo
var forkCombo = config.forkCombo
var watchTypeRadios = watchTypeForm.getElementsByTagName('input')
for (var i = 0; i < watchTypeRadios.length; i++) {
var watchTypeRadio = watchTypeRadios[i]
var watchValue = watchTypeRadio.getAttribute('value')
if (watchValue == watchType) {
watchTypeRadio.checked = true
}
}
watchTypeForm.addEventListener('click', function() {
var e = event || window.event;
if (e.target && e.target.nodeName.toUpperCase() == "INPUT") {
//localStorage['watch_type'] = e.target.value
watchType = e.target.value
backgroundPage.setLocalStorage(watchType, starCombo, watchCombo, watchCombo)
}
}, false);
var combosActionForm = document.getElementById('combo_action_id');
var combosActionCheckboxs = combosActionForm.getElementsByTagName('input')
for (var i = 0; i < combosActionCheckboxs.length; i++) {
var combosActionCheckbox = combosActionCheckboxs[i]
var combosActionBoxValue = combosActionCheckbox.getAttribute('value')
if (combosActionBoxValue == 'watch' && watchCombo == 1) {
combosActionCheckbox.checked = true
} else if (combosActionBoxValue == 'star' && starCombo == 1) {
combosActionCheckbox.checked = true
} else if (combosActionBoxValue == 'fork' && forkCombo == 1) {
combosActionCheckbox.checked = true
}
}
combosActionForm.addEventListener('click', function() {
var e = event || window.event;
if (e.target && e.target.nodeName.toUpperCase() == "INPUT") {
var checkboxValue = e.target.value
if (checkboxValue == 'watch' && e.target.checked) {
watchCombo = 1
} else if (checkboxValue == 'watch' && !e.target.checked) {
watchCombo = 0
} else if (checkboxValue == 'star' && e.target.checked) {
starCombo = 1
} else if (checkboxValue == 'star' && !e.target.checked) {
starCombo = 0
} else if (checkboxValue == 'fork' && e.target.checked) {
forkCombo = 1
} else if (checkboxValue == 'fork' && !e.target.checked) {
forkCombo = 0
}
backgroundPage.setLocalStorage(watchType, starCombo, watchCombo, forkCombo)
}
}, false);
0x06 各个模块之间的通信
首先简单总结一些,在三连功能中,上面三个模块的作用
- content script: 实现js注入,创建combo按钮,设置点击事件,与background通信,读取配置
- background: 提供配置文件的保存与读取功能
- page_action: 提供配置按钮,写入配置
各个模块之间其实都是可以互相通信的,这里我用到的,仅仅是content script 与 background 之间的通信,以及 background 与 page_action通信
- background 与 content script之间的通信
content script中通过chrome.runtime.sendMessage来与background进行通信,这里设置了请求成功后的回调,对background中的返回的信息进行解析
1 | chrome.runtime.sendMessage('', function(response) { |
background通过 listener来监听其他组件发来的请求,并使用sendResponse进行响应1
2
3
4
5
6
7
8chrome.runtime.onMessage.addListener(function(request, sender, sendResponse) {
var response = new Object()
response.watchType = localStorage['watchType']
response.starCombo = localStorage['starCombo']
response.watchCombo = localStorage['watchCombo']
response.forkCombo = localStorage['forkCombo']
sendResponse(JSON.stringify(response));
});
- page_action 与 background 进行通信
这个就非常简单粗暴了,通过chrome插件的api获取background对象,再直接调用background提供的函数就行了1
2var backgroundPage = chrome.extension.getBackgroundPage();
var config = JSON.parse(backgroundPage.getLocalStorage())
0x07 保存配置文件
因为涉及到配置,所以肯定就需要有保存配置的功能了,这里首先需要申请‘storage’权限,这里见上文中关于配置文件的说明,其实各个页面都可以使用配置文件存储的功能,但是这里想统一管理起来,所以选择了使用background做了配置文件相关的功能,使用的话非常简单,就是键值对的读写。1
2
3
4
5
6
7
8
9
10
11
12
13
14
15function setLocalStorage(pWatchType, pStarCombo, pWatchCombo, pForkCombo) {
localStorage['watchType'] = pWatchType
localStorage['starCombo'] = pStarCombo
localStorage['watchCombo'] = pWatchCombo
localStorage['forkCombo'] = pForkCombo
}
function getLocalStorage() {
var result = new Object()
result.watchType = localStorage['watchType']
result.starCombo = localStorage['starCombo']
result.watchCombo = localStorage['watchCombo']
result.forkCombo = localStorage['forkCombo']
return JSON.stringify(result)
}
在写入之后,在chrome的开发者页面也是能看到保存的信息的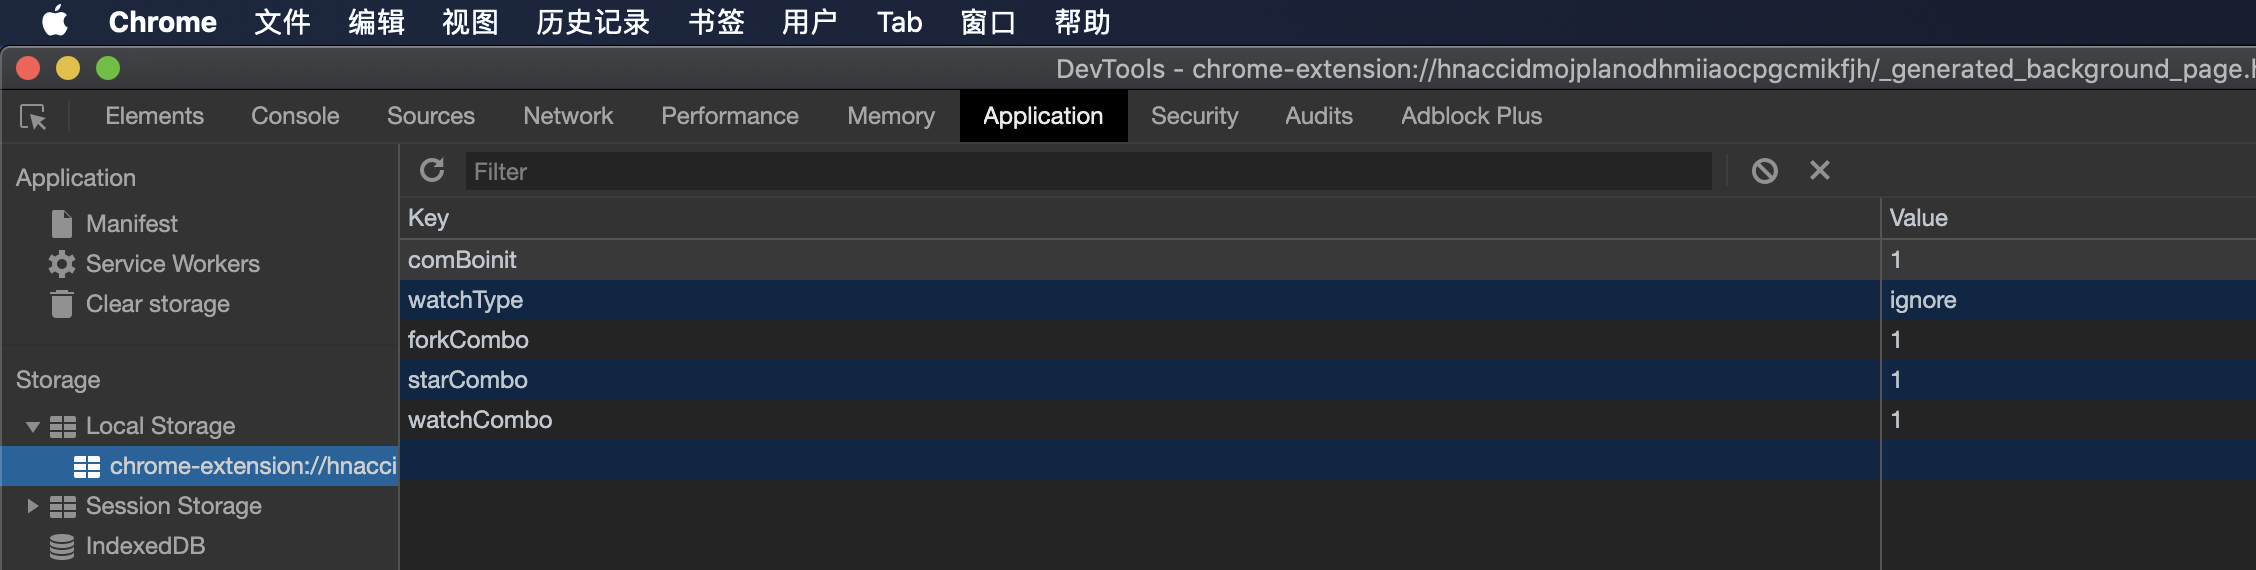
0x08 总结
总的来说,chrome的功能我感觉还是挺强大的,本身用的好的话也能实现很多很有趣的功能,学会写这个,感觉也能给一些工作或者生活带来少许的便利吧。比较遗憾的是,现在新开发的chrome扩展再上架到扩展商店的话,也只能给chrome os来用了,所以这里就没做上架啥的了。
0x09 参考
这篇文章的作者写的很详细了,有兴趣的朋友也可以看看
https://www.cnblogs.com/liuxianan/p/chrome-plugin-develop.html